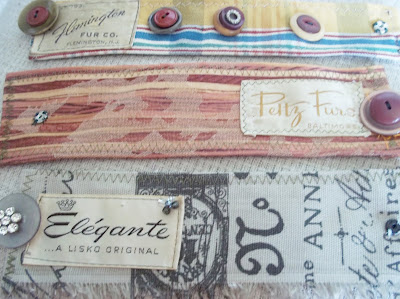
First, hoard all fabric scraps you can find. Same goes for ribbon, pretty trims, grosgrain ribbon on gift bags. No scrap is too small.
 Think like your Grandma who lived through the Great Depression in her sister’s hand-me-downs. Cut the pockets off of your kiddos’ stained and worn pants – repurpose later on a new tote, scrapbook page. My person motto - never let a button go to Goodwill when you can stick it in a mason jar for 20 years!
 I start with a pretty scrap of fabric or theme. Insects anyone? Paris anyone? Birds anyone? All are super popular right now! I then look through my suitcases and gray totes of fabric –
  seriously, my bed is on risers and my storage unit maxed out because of my love of fabric. I always go with a mix of similar tones and I like the fabrics to be of the same weight or texture for the most part. I don’t like to swap out needles (frugal!) and adjust the tension (lazy!), but it seems to work for me. I always think about the rule of 3rds. And try to give the eye somewhere to rest – poor little Plain Jane scraps are my friend! They make your busy prints pop. Same with graphic stripes and patterns – I like to really mix it up – but I have to watch scale – too many small prints look busy – too much big stuff gives you a crazy look.
When asked how I do it I like to say that I sew myself into a corner. Interestingly enough, I sew in the corner of my living room. So/sew literal and figurative – wow. That’s as deep as I can go with that…
What I mean is that I don’t plan. I don’t sketch. I never, ever measure. I usually start by cutting a large, odd chunk of fabric and then sewing another odd shaped piece onto it.
 No logic. Always using the selvage and rough edges – a rough loopy selvage is like free designer trim! Instead of sewing the old way (right side to right and pressing seams open) just fold over a raw edge and top stitch it to another piece of fabric. I love the pop of contrasting top stitch – I’m not a perfectionist so I go for the really wide zigzag which can camouflage errors.
  I just randomly sew fabrics and start thinking about a front and back. When I get a piece all sewed together and measuring at least 24 inches (guess-timate!) and 14 inches wide, I fold it in half sandwich style – right sides together. I peek inside and see if there are any glaring issues – like the same pattern being sewed together in different directions. I may add to it, or I may only use a part of this. I may hate it and toss it aside for future use. If it’s good to go I sew up the sides – viola!
  A purse is born. Any excess I put aside and often incorporate in other totes or future projects (key chain anyone?).
I make a lining in the same way - usually one big scrap of fabric though – fold sandwich style. It should be about an inch larger on both sides and a few inches taller. I sew the sides, drop the lining inside the exterior, fold down excesses and pin together.
 Topstitch it all together. For the handle, I get out a tray and once again, think about my color palette – then raid my buttons and baubles for any that add interest. I usually pull twice the fabric and gems that I need. I like a big variety. I generally start with about 2 pieces of thin ribbon. The 2/$1.00 craft stuffy is perfect for this – it is strong, thin and cheap!
 Then I start stringing a button or two, knotting the ribbons together, weaving the ribbon through. No two are ever the same – it just comes to together naturally. While I watch TV with the kids. When I get a nice long strand I sew the ribbon ends to the ends of the purse. I hand sew a big old button with a ribbon closure and call it done!
Happy sewing! Use your imagination and don't go for perfection - there is a time and place for a perfectly crafted handbag - this isn't it. This is quirky, original, crafty...just like you! (Lessons with more details along the go will be added)

 Here's a religious icon inspired purse, I wasn't sure which way to go, but I think Mary looks lovely... the beads were inspired by some wooden rosary beads I have...


 I hand sewed about 60 small mother 'o pearl buttons for a unique handle of this purse...

 Stella is getting back in action by modeling my Loom stuff, here's a wristlet...
 and last but not least... a little Halloween fabric, I had some left over from a little pre-school outfit I'd made for Olivia a few years ago... Boo!
 Thanks for stopping by! Get crafting and sewing!

 What better sewing tote than one covered in this witty comic-strip fabric - 50s style but oh so current for me! I would rather sew than just about anything. Right now I'm loving the new season of


 Happy sewing!
 CDG
CDG


 And the rest of the pic are from an eclectic boutique. I showed some of their very modern stuff on a post a few months ago - here are a few more random.


 and last but not least... a pretty apron. The tote, apron & fabrics are available at


